


How about one more Elzy with Paperie card from my upcoming class at Right at Home?
This little class was so fun to design - the ribbon assortment is just fabulous and the paper is just cute, cute cute. (I just picked up the blue and green version, so get ready....)
I have to say, it is quick to design when everything is all coordinated like this all matchy matchy.....
I did mostly 4 1/4 square cards for this class, but I wanted to be able to get a nice bow onto this card (have you noticed my recent penchant for actual bows lately.... not just a knot? I shudder to think what these poor bows would look like after a mailing... would the recipient know to fluff it back up... hmmm?) and the sentiment here is a little larger so I got to use a standard A2 card for this one.
I did also streamline the design on all my designs for this class. There isn't a nestie in the bunch (GASP!) and I have only one diecut tag among all five of the cards. I know, I can hardly believe it myself......
And take a peek a Sara's most recent tweak to my blog... do you see my new little animated signature down there. aaaak, makes me smile!


 I hope that you were able to drop by to visit at the Land Cruise last night on the


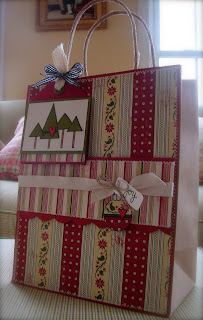 I mentioned the bag and tag set we'd made during my
  For sure, my favorite part of the project is the little charm created by paper piecing the ornament in the Kim Hughes


 I've been having such fun playing with my Top Note die from


