


Today I have a really fun feature for you! I'm always so excited each month when my Paper Crafts magazine arrives in my mailbox. I love to cozy up in my living room with a cup of tea and peruse all the beautiful creations! I'm always learning new things, picking up tips and tricks and I love to look for names I recognize from "blogland."
So, when I was asked if I'd help spread the word about the new special issue titled PC Gourmet I was of course so very excited! Its full of 110 recipes and coordinating projects.
The magazine makes a wonderful gift to yourself, or a crafty friend. And the items I've seen from the inside, oh YUM to both the eyes and the belly! I'm certainly ordering myself a copy!!
Just a note that today's tasty looking recipe and adorable tag to coordinate are not my creations, they are the work of Paper Crafts Pro Alisa Bangerter!
Once you've been tempted by Alisa's yummy recipe and sweet coordinated tag, you can order your very own copy HERE
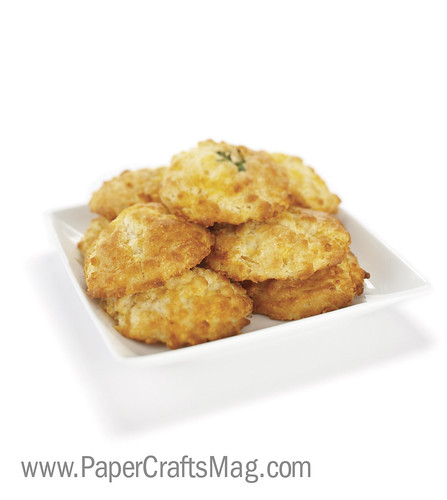
Cheesy Garlic Drop Biscuits
- by Alisa Bangerter
This is a perfect recipe to pull out if you are short on time because there is no rolling or cutting. The cheese and garlic add extra kick to a plain biscuit, and kids love them. They are the perfect accompaniment to serve with soups or stews, and are great served with a salad.
INGREDIENTS
2 c. flour
2 t
bsp. granulated sugar
4 tsp. baking powder
1 1/2 tsp. garlic powder
1/2 tsp. salt
2/3 c. butter or margarine
1 1/2 c. grated cheddar cheese
1 1/4 c. milk
Chives (optional)
DIRECTIONS
Mix together dry ingredients. Cut in butter with pastry cutter until mixture is fine. Add cheese and mix well. Add milk and stir until just moistened. Drop by spoonfuls onto greased baking sheet. Sprinkle top with chopped dried or fresh chives if desired. Bake at 400 degrees for approx. 15 minutes.
And then look at this adorable tag that Alisa created to go along with her treat! What a sweet way to package this up for a friend, or a festive table decoration if you're headed to, or hostessing a halloween party this week!
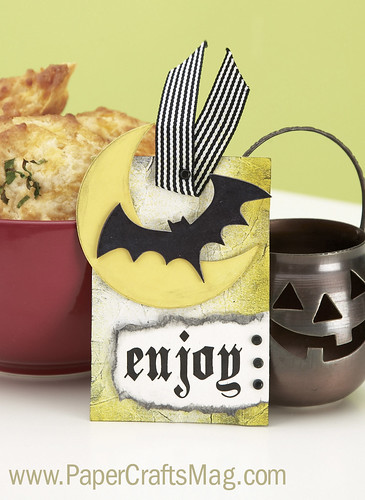
Enjoy Halloween Tag
Designer: Alisa Bangerter
SUPPLIES: Cardstock: (ivory) Dye ink: (Black) Stewart Superior Corp.; (Summer Sun) Stampin‚ Up! Specialty ink: (Mango Lemonade color wash) Stewart Superior Corp. Color medium: (black chalk) Craf-T Products Accents: (black brads) Making Memories; (chipboard bat, moon) Melissa Frances Fibers: (black striped ribbon) Pebbles Inc. Font: (Black Family) www.dafont.com Adhesive: (foam tape) Finished size: 3" x 4 1/2"
1 Make tag from cardstock. 2 Crumple tag and smooth out. Spray edges with color wash; let dry. Apply chalk. 3 Ink chipboard moon; let dry. Chalk edges and adhere. 4 Ink chipboard bat; let dry. Adhere with foam tape. 5 Print sentiment on cardstock; trim and tear edges. Chalk edges and adhere with foam tape. Attach brads. Attach ribbon with brad.


1 Comments Post a Comment:
What a really cute container and what yummmmmmmmy contents!
Post a Comment