


I'm participating in today's Creative Chat with the My Favorite Things Designers. We've been asked to share any photography tips or tricks that we have for you.
To begin with, here's the camera I've been using for the last six years. I've been really happy with the results, and its just a point and shoot. I've recently started working with a fancy DSLR - which I adore, but I'm still getting used to working with...

On my camera, I use this panel of buttons to adjust the settings, the flash, and to be sure I have my MACRO on for fine details.

By looking at this on screen image, I can see that I've shut the flash off (Do you see the little arrow down with the big circle no over the top of it? That means I have my flash off....) The flash causes some really funky color issues, so don't use it. Check your camera manual to see how to disable yours.

I also highly recommend finding your MACRO button on your camera. This will get crisper photos for you, with all the little details shining through. The little flower icon on the bottom left hand corner shows that the "MACRO" settings are on.

I have two pieces of 12x12 white card stock that I set up inside the box (for a while there I had two beige-ish pieces of Bo Bunny Double Dot...) as my background. Having bright white cardstock as my background helps me to color correct in Photoshop.
I actually, literally lie on the floor to take my photos so I can get nice and close to the card. I also like the way that it props my elbows in place to hold the camera still. Helps with focusing.
Editing:
I take a zillion photos of each of my cards. It takes a whole bunch to find one that the focus is just right, that I haven't accidentally cropped off the edge of my bow etc.
Now when you're editing your photos, be your own worst critic. When you have the card up on screen to edit the photo, if you notice a mistake, go fix it and re-shoot. Crooked panels, smudge lines, uneven inking on your sentiment, coloring that bled outside the edge. Go fix it! Setting up a shoot again is a pain for sure, but this is a great chance to see all the fine details up close. If you don't like what you see, go fix it. Trust me, it's worth it....
Personally, I edit in Photoshop Elements, I use it to crop my photos, make color adjustments and to apply my watermark to each of my photos. There are a few standard things I *always* do to fidget with the images I pull from my camera. I highly recommend taking a course to help you expand your understanding of Photoshop. Jessica Sprague has a whole series of photo editing courses here.
The most basic thing you'll do is crop your photo....
Select this little tool from the sidebar....

Click and drag to highlight the area you want to keep.... click the green check mark to approve the changes or the red circle to reject the changes....

Then, here's a few things I do to "adjust" the colors to make it accurately reflect the colors of the project, and to brighten up the white space behind the card. Any grey shadows behind your card will make the photo drab, brightening up that white will help your card pop off the page....
Adjust White Balance.


Finishing your files.
Do you see in the photo above how it lists "layer 1" and then "background?" To save your files as a JPEG, you'll red to flatten your layers. To be able to use these files, you'll need to do the following:
"Layer" and then "Flatten Image"
Then you'll be able to save your image as a JPG file which will be useable in online galleries, on your blog etc.

Phew! Sorry for the longest post ever, but hopefully you found a few tips and tricks for card photography. If I can help you at all, be sure to drop me an email. You can find the email me widget at the very top of my blog....see, it looks like a tiny piece of mail? Be sure to visit the MFT Blog today for a full list of designers with photography tips to share with you!

*In case you didn't notice, I'm running Blog Candy here*
To begin with, here's the camera I've been using for the last six years. I've been really happy with the results, and its just a point and shoot. I've recently started working with a fancy DSLR - which I adore, but I'm still getting used to working with...

Lighting & Camera Settings:
My first recommendation is to walk you house to get familiar with the best natural light. Look for a nice sunny area, without shadows. I always know that the best time of day to get photographs at my house is at about 10 am in my front foyer, you'll have to see what's the best for your house... As the day progresses, I can still *get* a photograph in this room, but the lighting isn't optimal.
If you can't find a place in your house that has enough natural light for a crisp image, you can supplement with OTT Lights. They are a natural light that will not adversely affect your photography. You can get them at your local craft store, or on Amazon.On my camera, I use this panel of buttons to adjust the settings, the flash, and to be sure I have my MACRO on for fine details.

By looking at this on screen image, I can see that I've shut the flash off (Do you see the little arrow down with the big circle no over the top of it? That means I have my flash off....) The flash causes some really funky color issues, so don't use it. Check your camera manual to see how to disable yours.

I also highly recommend finding your MACRO button on your camera. This will get crisper photos for you, with all the little details shining through. The little flower icon on the bottom left hand corner shows that the "MACRO" settings are on.
Setup:
My sweet sister gave me a lightbox for Christmas a few years ago, and I use it every single day. It folds up quite nicely and tucks behind the couch --- so that I can pull it out and set up shop in the front hall!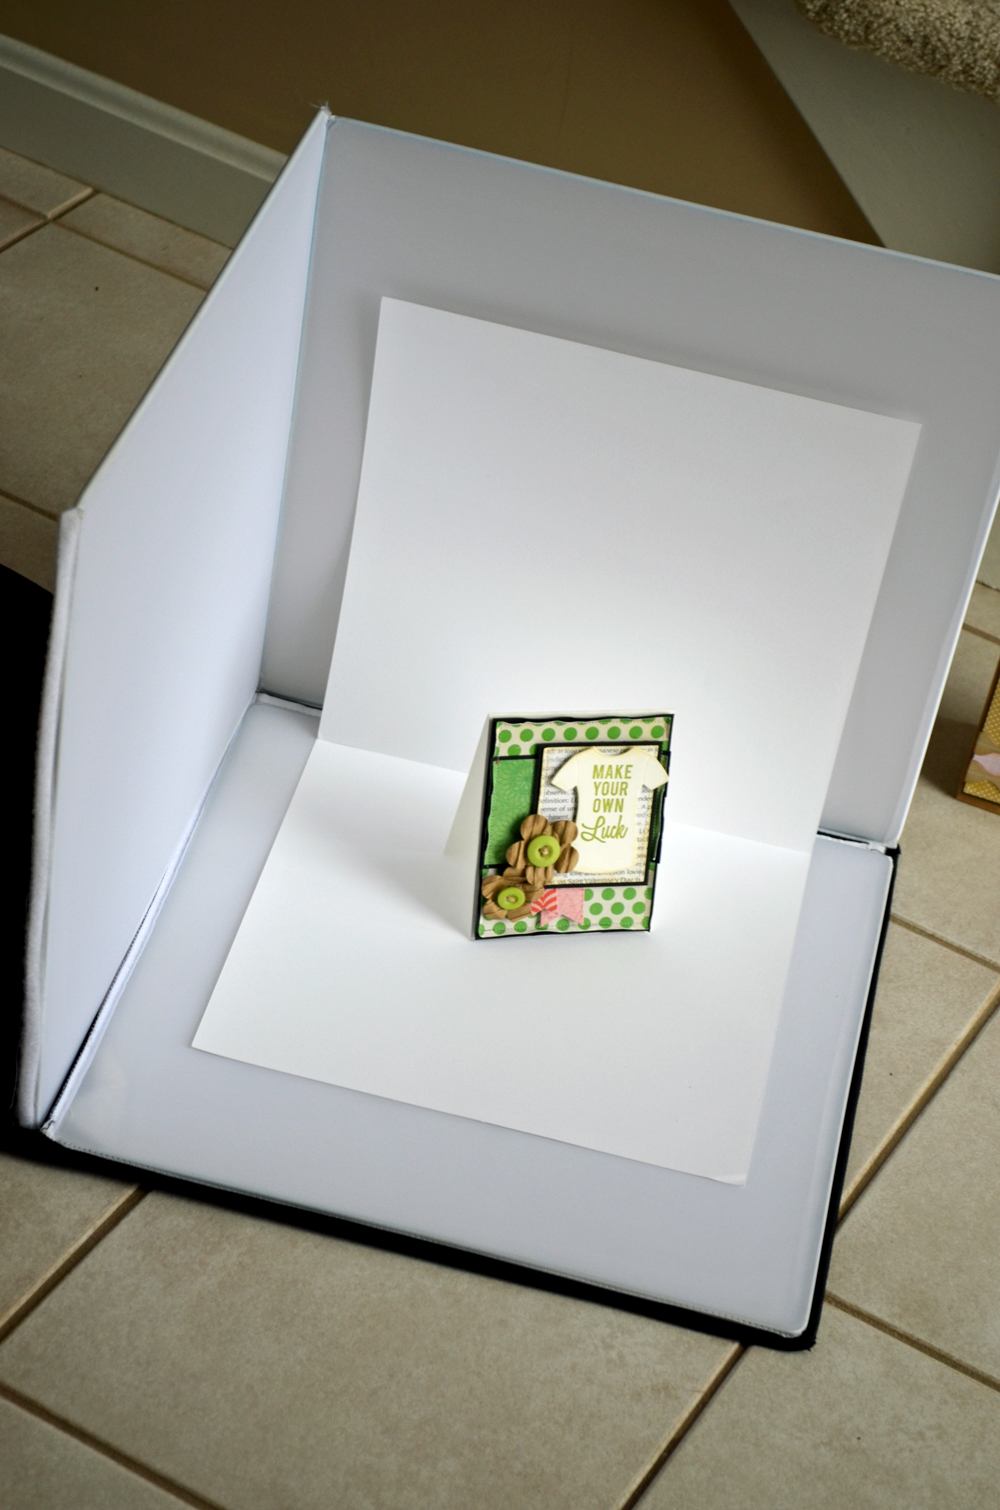
I have two pieces of 12x12 white card stock that I set up inside the box (for a while there I had two beige-ish pieces of Bo Bunny Double Dot...) as my background. Having bright white cardstock as my background helps me to color correct in Photoshop.
I actually, literally lie on the floor to take my photos so I can get nice and close to the card. I also like the way that it props my elbows in place to hold the camera still. Helps with focusing.
Editing:
I take a zillion photos of each of my cards. It takes a whole bunch to find one that the focus is just right, that I haven't accidentally cropped off the edge of my bow etc.
Now when you're editing your photos, be your own worst critic. When you have the card up on screen to edit the photo, if you notice a mistake, go fix it and re-shoot. Crooked panels, smudge lines, uneven inking on your sentiment, coloring that bled outside the edge. Go fix it! Setting up a shoot again is a pain for sure, but this is a great chance to see all the fine details up close. If you don't like what you see, go fix it. Trust me, it's worth it....
Personally, I edit in Photoshop Elements, I use it to crop my photos, make color adjustments and to apply my watermark to each of my photos. There are a few standard things I *always* do to fidget with the images I pull from my camera. I highly recommend taking a course to help you expand your understanding of Photoshop. Jessica Sprague has a whole series of photo editing courses here.
The most basic thing you'll do is crop your photo....
Select this little tool from the sidebar....
Click and drag to highlight the area you want to keep.... click the green check mark to approve the changes or the red circle to reject the changes....

Then, here's a few things I do to "adjust" the colors to make it accurately reflect the colors of the project, and to brighten up the white space behind the card. Any grey shadows behind your card will make the photo drab, brightening up that white will help your card pop off the page....
Adjust White Balance.
- Select the "Enhance" "Adjust Lighting" and then select the little white eye dropper.
- Click on an area of your photo that is white, and the program will automatically adjust your photo to make anything that is supposed to be white, a "true white"

This isn't a science, so you might need to cancel and try another place on the photo if you aren't pleased with the results.
Add a Photo Filter.
On the right hand side, you can add what is called an adjustment layer. To get to this menu, you'll need to click on the circle that looks half white, and half dark.....
Roll over and select "photo filter"

I like to play around adding different photo filters to improve the quality of the photos.

Depending on if your original photo is "too warm" or "too cool" you'll find an improvement with different filters. I use either the top three "warming" filters or one of the next three "cooling filters"
If you find one you like, you can also adjust with the slider how much of an adjustment you'll need.

Increase Midtones.
I often like an improvement of soft brightness that I find I can achieve with the following
- "Enhance"
- "Adjust Color"
- "Adjust Color Curves"

There are a series of adjustments you can make here, but I like the box that reads "Increase Midtones." Select that and then click "OK."
Apply watermark.
If you have a watermark file, you can easily apply it in watermark. Here's how I do it.
Open the file. "Select All" then select "Edit" and then "Copy."
Click back over to the photo you want to add the watermark to and then
"Edit" and "Paste"
Your watermark may come over huge in size, you can then resize the watermark and move it to your desired position over your photo. Click the little green check mark to approve the change in size and location....


If it is too bold for your liking, you can adjust the weight of it, to make it more transparent by selecting the opacity.


Finishing your files.
Do you see in the photo above how it lists "layer 1" and then "background?" To save your files as a JPEG, you'll red to flatten your layers. To be able to use these files, you'll need to do the following:
"Layer" and then "Flatten Image"
Then you'll be able to save your image as a JPG file which will be useable in online galleries, on your blog etc.
Phew! Sorry for the longest post ever, but hopefully you found a few tips and tricks for card photography. If I can help you at all, be sure to drop me an email. You can find the email me widget at the very top of my blog....see, it looks like a tiny piece of mail? Be sure to visit the MFT Blog today for a full list of designers with photography tips to share with you!


18 Comments Post a Comment:
Nicely done, Ms B! I love your tip on walking your house to find the right light, that's genius! Your tutorial was so helpful too -love that eyedropper correction!
Oh my I so LOVE your new blog design Joanne!!! It's absolutely gorgeous!!! Thanks for the fab photo tutorial. I like the lightbox you can fold, so handy.
saweet!!!loved how helpful this was. I am ordering photoshop TODAY! I've put it off long enough. thanks for sharing, Jo.
Great tutorial! I will have to try some of those filters. LOVE your new blog look!! Did you do it yourself? It is fabulous!
Wow, I'm so happy you posted these great tips in great detail. Thanks a bunch!!
KEEP THEM COMING : )
Wonderfully helpful Joanne, thank you! (Love the new blog design too!)
Thanks for the great tutorial, Joanne! I like the light box that folds! I use a sheet of poster board in my foyer, and yes, I lie on the floor, too! I always wonder what the neighbors driving by must think...lol! Love the new look of your blog! Hope that you are enjoying your summer! :D
Thanks for the tips Joanne - I need to find a lightbox like that. Right now I had a couple of cardboard boxs. LOL... however I am taking photos outside while it's so nice. Thanks for taking the time on this!!
Great tips Joanne, love seeing your process! You will love all the capabilities of your new DSLR...especially the ISO capabilities in low light. Do you have the "nifty fifty" lens yet for your DSLR. That lens lived on my camera for a while. Love your new blog design too! So cool!
Thank you for the photo tips - a fabulous tutorial.
Love ths tutorial Joanne! Can you tell me where or how I can get a watermark? Thanks soo much!
LOVE love your new blog design. It looks so "you"!
I have almost the same camera, but unfortunately I do not have Photoshop. I use Picasa3. I might be able to operate it if I follow these fab directions though. :)
Hugs~
Thanks for the awesome tutorial Joanne! It's always fun and interesting to see how other crafters photograph their projects! Thanks for taking the time to share!
I always read your posts through FeedBlitz, but I rarely comment. I found this post so helpful that I just had to drop you a line! I knew about the natural light setup, but I didn't know about light boxes or the macro setting on my camera. I also don't have PhotoShop. I obviously knew that a lot of people use it, but I had no idea that you use it to tweek EVERY PHOTO! I may have to look into that! Thanks for the great post, Joanne!
Thank you so much for this detailed tutorial! These MFT posts this week are so helpful for beginners like me. Thank you, thank you!
Thanks for these tips. They are very helpful.
This was extremely helpful, Joanne! I'm scouring the net trying to find that light box that you have, because I think that would be perfect for my setup :D
Post a Comment