Admin Control Panel

Posts Change Layout Sign Out
Showing posts with label PTI. Show all posts

Oct 17, 2010

Sunday, you're so sweet.....

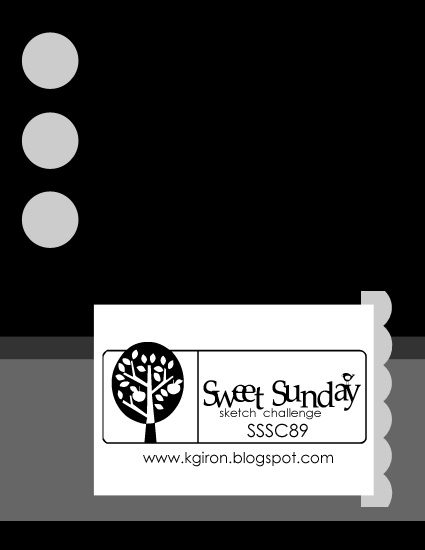
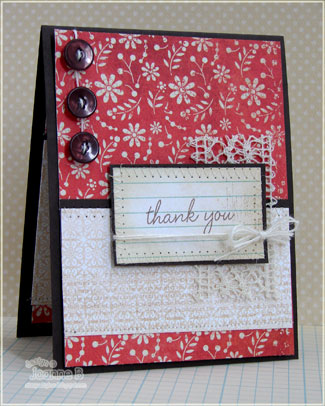
Its another Sweet Sunday Sketch challenge, and it was a great excuse to stamp up a hopelessly delayed Thank You note to a dear friend.


My design is pretty clean, with just a simple "thank ou" on the main panel, and of course, a whole lot of sewing.... but that little scalloped piece threw me. I reached for a little bit of vintage trim and for my three circular elements I strung three buttons together, and for a twist, I left the thread between them, and adhered them as a chain of buttons, instead of three individually set buttons.


I'm using Inside and Out: Thank You from Paper Trey Ink. I really needed a great all purpose Thank You set, and I think this back to basics type set will be perfect. I was able to finish off this card with a beautiful coordinating sentiment on the inside.

Be sure to stop by all of the girls on the Sweet Sunday Sketch challenge team to see what they've put together. You'll find the original sketch from Karen Giron on her amazing blog The Sweetest Thing

then be sure to hop around to visit all the girls - I just love seeing the twist everyone puts on the sketch each week - fun!!

May 8, 2010

A late little SFYTT

I had this card completed for last week' Sketch for You To Try, but amidst a crazy week, I somehow forgot to upload it. Whoops. But, since I had fun making it, and since I pretty much like it, I'm sharing it now.

I'm addicted to this paper from October Afternoon's Thrift Shop, I picked mine up at Jacksonbelle Embellishments and let me say Lindsey had the fastest EVER shipping! Enabler Alert - when hooking up the link, I noticed a Mother's Day sale through tomorrow. 30% off the entire store - RUN!!

Its also a great opportunity to let you know that this week's Sketch For You To Try is being sponsored by My Favorite Things. A $25 gift certifcate AND a Jumbo Scallop Die-namic. Whoo Hoo! You'll find Jen's adorable sketch (which I will use and post before the next one goes up...) over HERE


Mar 30, 2010

Quick Notes on a Busy Week

Its been a little quiet over here on the blog lately, but its been crazy in real life. I've been busily preparing samples for the upcoming launches for both MFT and TCP. All I can say, is get excited. Be very excited.Because cute things are coming.

I'll have my first sample for the upcoming TCP Release tomorrow, and I'm hoping to get another done today so that I'll have one on Friday as well. And then, get this....I'll have samples for MFT Saturday, Monday, Tuesday and Wednesday! I know. Seriously! Its a HUGE release!

This past weekend I got to visit with both Kim and Alma who were here in Boston for a trade-show. Kim and I had a fun shopping excursion on Saturday morning. That afternoon I taught a class for MFT, then helped facilitate in Alma's class. After a quick bite to eat and an hour off our feet, we had three hours of make and takes with store owners that evening.

We had so much fun, and I got to meet so many of the wonderful retailers who carry the MFT and TCP lines, it was a blast! (waves hello to all my new friends!)

I'll have my make and take sample to share with you soon, but it has some new release goodies included, so not just yet! (evil, I know...)

I bought this set from Paper Trey, so very long ago, and even made this sweet little notebook. Which I then promptly forgot to blog. Honestly, I had big big plans for this sweet set. And I WILL put it to good work. Soon. Okay, soon-ish....

Feb 15, 2010

A Fabulous Week Ahead!

Hi everyone! I hope you had wonderful wonderful weekend! Ours was crazy busy (as usual) but lots of fun.

Today I've got a quick card to share with Signature Greetings from Paper Trey Ink as well as lots of October Afternoon scraps that I tied together with some stitching, and of course, a buttony bow!

This week I've got LOTS of fun stuff to share:

Tuesday: I'm this week's TCP's hostess, and its a color challenge

Wednesday: MFT's VIP Kit will be for Sale - blog hop will be Tuesday night into Wednesday morning. This amazing kit will be a one day only offering! Grab them while they LAST!

Thursday: I'm announcing a HUGE blogaversary celebration, complete with challenges and blog candy. I really, and truly hope you'll play along!

Friday: Bellariffic Friday - make sure to have your sample in to Emily by Thursday at 5pm to be included in her weekly roundup!

Hope to see you there! I'm on auto post for the next few days to spend some quality time with the family...but I've been blogging my brains out in advance so that you'll have eye candy and fun news EACH day!!

Feb 11, 2010

Valentines goodness continues....

Is it just me, or is Valentines Day a cardmakers DREAM or what?

Now that all these goodies (Peppermint Patties, and Ghiradhelli Chocolate) are all tied up in bows, buttons and twine, I can't eat any more of them. That is a good thing!

This is the set of teacher and bus driver little gifts for tomorrow.

I'm getting a lot of mileage out of this stamp set "Tiny Treats: Valentine" from Paper Trey Ink. And, I think I've fallen completely, head over heels in love for the tiny polka dotted ribbon.

Jan 9, 2010

Designed for Sympathy

The other day, I received a phone call from my Aunt, who needed to have her stock of sympathy cards replenished.

As a cardmaker, it is the type of card that I always find so hard to make, but sadly, that we all need to send at some point

That being said, its one of those times, that a handmade card says just so very much. I wanted something that was cleanly designed and full of thoughtful details.

To keep the card respectful of the occasion, yet full of thoughtful details, I reached for for my Cuttlebug Embossing folder and my Out on a Limb Sentiments, Background Basics: Text Style II and Damask Designs stamp sets.

I was so thankful that my order from Paper Trey Ink had just arrived containing the In Bloom patterned paper.

You can barely see it in the photograph, but the text is actually overstamped with the Damask pattern.

To tie the main panel together, I've added stitched detail with my sewing machine, stitched grosgrain ribbon, and some Apron Lace trim across the bottom.

All the edges have been softened with the Tea Dye Duo. Seriously LOVE the stuff, really I do!

Remember when you're making cards with a dark cardbase (I've used Scarlet Jewel here) that you want to line your cards with a lighter color. This is especially important if you're planning to sell them!

While you can write on the inside with a white gel pen, they aren't always 100% reliable, and then you've messed up the inside of your pretty card! So, save yourself the hassle, and just line your cards.

Thanks for stopping by today, I hope you have a truly wonderful weekend.

Oct 1, 2009

Oh Damask.....

I've long admired the Damask set from Paper Trey Ink. At CHA it was in and out of my hands only about a hundred times. As I was packing my bags to come home to Boston, I was seriously regretting not having picked it up. But, I was *trying* to adhere to a budget!!

So, on my most recent order, when I was stocking back up on my essential ribbon - the saddle stitch, and picking up some more buttons, of course, the Damask set just jumped into my cart to join them.

I can't believe that I hadn't yet played along in Dawn's color challenges. She always has such fresh color combinations, that I wouldn't reach for on my own. This combination is simply gorgeous, just **look** at that yummy fabric, but then when I sat down, I started to scratch my head a little (and I was bemoaning not yet having all the PTI ribbons up on my shelf...)

I usually get all crazy with the layers and the stitching, but for this time, I really just enjoyed stamping with that beautiful background, and keeping the overall design clean. Its nice to step out of your "normal" routine now and again. What's interesting is that my mother and sister repeatedly tell me that these types of designs are their favorite.

When I design cards for a customer order I like to try to keep them mailable (my usual designs are pretty pricey to mail with all the extra embellies and layers on top. They usually only just barely can fit into an envelope!!)

Now as you can see, I just can't seem to leave well enough alone because as I sat down to create a card for my father's birthday I still had this color combination on my mind, and gave it another whirl. You'll see though, that I didn't stay true to the simple layering and got a little bit more complicated with a few extras.... .

So which is your style, cleanly classic or loaded with the extras... me I'm not sure because I honestly like playing on both sides of that fence...

Aug 10, 2009

Got Baskets?

I happen to have some dangerous friends. These girls are very serious enablers when I'm reading their blogs. But shopping together, ouch!!! It's even harder to resist!

Okay, okay, I'll admit, I happen to be a pretty bad enabler myself. In fact, after a while, Kirsten and I were joking "I won't buy it, if you don't." But in a moment of weakness, we both picked up this set "Vintage Picnic."

I adored this set when it was released a few months ago, and then we all collectively drooled over the samples in the booth. In fact, *someone* not naming names here, suggested that they were maybe good enough to eat. Someone decided that a little challenge was in order. And well, a girl just doesn't like to be left out now does she?

I also picked up some adorable October Afternoon paper at the show, which I couldn't wait to dig into. Combined with my new Paper Trey Ink Buttons and Ribbon, I was on my way!

I must say that The Paper Trey Ink booth at CHA was simply amazing. We waited in a line to get in, and let me say it was worth every minute of waiting. To see the colors in person, and all
the matching ribbon and buttons (hello, have we met, do you know how ribbon and buttons make this girl go a little weak in the knees?)

We were greeted by Nicole and Dawn each time we went to the booth - yes, I said each time, we were there more than a few times. In fact, it was downright comical how much we were lurking over there, trying to figure out which items were on our list, but not yet in our suitcases.

I love the versatility of this set, there are so many fun sentiments, and items all perfectly sized to fit within the baskets. I had so much fun playing around that I already made two samples - this second one incorporated my new fabulous Tea Dye Duo that one of the girls, (maybe Leigh?) said would be a must have. And guess what? She was right. I love it!

To see how the girls have put their baskets to use please hop around to visit my shopping buddies......Carole, Amy, Leigh, Kirsten, and Christina

Aug 2, 2009

Enjoying Life - and my stamps too!

I'm just home from CHA and resting on the couch with my little ones. It was a fantastic trip, but I'm exhausted from late nights up with friends. I figure, when you only see people once or twice a year, that you make the most of every minute your time together. And for us, that meant, only a few hours of sleep each night.

I realized that I hadn't ever shared a fun little gift set I'd made with Paper Trey Ink's "Life" set and thought that I'd hop on over here, say hello and share....

I downloaded the Timeless Template called "From the Desk Of" with the full intention of making a set of notecards to go inside. But, you know me and all my layers, they weren't going to fit.

Then I realized that I could also use the sweet little box as a gift organizer, leaving my friend this little 3d box for her to organize whatever she'd like, bills, receipts etc.

I started with the altered DVD tin turned into a photo album. I figured that would use the most paper and I wanted to have lots of options.

By inking portions of the sentiment individually, I was able to line up the sentiment to fit across this nestie diecut and tucked it around the bottom of the "f" in life all nice and snugly.

Then, of course, it needed a
coordinating card for the gift! Once you've got one item done, the next pieces are easier, because you have the general elements outlined, color palette, which ribbon to add etc.

Using just a bit of scraps, I added a little notebook by altering just the top of a junior legal pad and a bit of gingham ribbon for a finishing touch. (silly me, I don't think I got a picture of that piece, but you get the idea...)

With just enough paper left, I cranked out one more similar card using all the same papers and inks. This time, I stitched that polka dotted layer in place, and opted out of any nesties, reaching instead for my beloved edge distresser and sewing machine.

Sometimes I struggle with whether I should go for the"more" version or the "less". When I made this, I originally preferred the one with the accordion layer... now I think I like the version with everything sewn in place....

I had such fun admiring the beautiful samples at the CHA booth over weekend. I'm inspired to dig out my stamps, and play with some new to me cardstock, buttons and ribbon (really
aren't they a crafter's best friend?)

I'm going to try to make an effort to keep playing like this to make a dent into my ever growing paper collection, fill my card basket so that I've always got something on hand. Oh, and to justify my new stamp purchases too!

Feb 12, 2009

Kindergarten Valentines!

I've been busy making valentines for my son's classmates and teachers all week.  Twenty two in the kindergarten, two teachers and then three preschool teachers.  Lucky for me the preschool class doesn't do valentines till next year! Whew!

My mom suggested I just go out and just buy some, but honestly, given the amount of materials I already had in my basement, that would be a crime!

Instead, I forced myself to just streamline the process, and come up with some clean and simple designs.  I put my new lOve sOngs stamp set from Paper Trey Ink to work and made one design for the boys, and one for the girls. 

Since I'm on a "paper diet" this was a great excuse to dig into my scraps and some papers that were even previously untouched! 

By keeping the designs simple, and going into mass production mode, I was able to get them done very quickly.  I cut all the paper one night, then cut nesties while we watched TiVo another night, then stamped all the images another night and then one afternoon I sat and adhered all the fronts to the card bases.

To save on cardstock since I know that these will end up in the trash (oh the horror) I created cute card fronts and attached them to confetti white cardstock - I had LOTS and didn't want to dig into my colored cardstock too much for this project. 

This third card, the red, kraft and black card, is the one that I'll tuck inside my little guys bag for him to open in school on Friday during their class celebration. 

I'll be back with teacher cards tomorrow!

My word of advice to those doing projects with children. Have them sign the cardbases FIRST then adhere your main panels. That way if they decide to make a mess of the inside you can just hand them another card base and save your pretty card! I learned that lesson the hard way last year when my son scribbled ALL OVER a finished valentine!

Supplies:

All cards use lOve sOngs stamp set from Paper Trey Ink.

Girls Card: Sweet Blush, Pink Patterns and Spring Moss stitched grosgrain ribbon.  Berry Sorbet ink for balloon image. Oval nestie.

Boys Card: Lemon Tart ink for ice cream top, Pure Poppy for cherry, Brilliance Pearlescent chocolate ink for sentiment (from Stamp a Sweet Impression) and ice cream cone.  Curvy rectangles Nestie

Love Note: Pure poppy cardstock, stitched grosgrain ribbon and ink, Fresh Snow ink, Basic Black and Kraft cardstocks and slit punch (Stampin Up) P



This blog has been Tweaked and Designed by Sara Williams | Powered by Blogger | Back to Top

Pin It button on image hover